The Permeability Property Modeling workflow
Permeability Property Modeling is the second workflow followed by the Permeability Function Modeling workflow in the Permeability strip (model > Permeability). The main purpose of this workflow is to populate your 3D grid with permeability properties, based on your permeability function model.
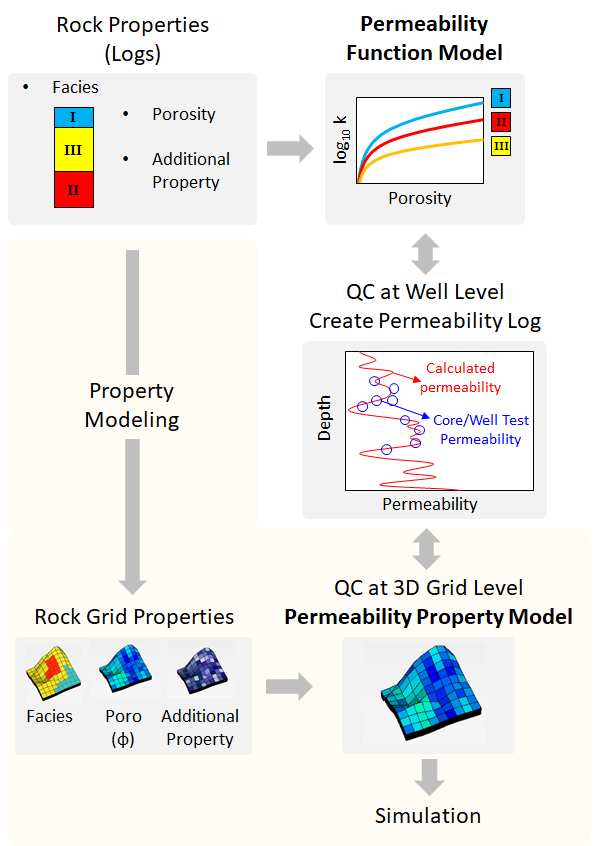
The Permeability Property Modeling workflow (highlighted in yellow). click to enlarge
The workflow starts with creating a new permeability property model. In the next steps, you assign a permeability function model, grid properties, and finally run the model. You can use the resultant permeability grid property as an input to the saturation property model and/or to the dynamic simulation.
Permeability Property Model is a container which holds all the associated metadata such as:
- Function Model The permeability function model which is used to populate the 3D grid with permeability properties.
- Grid Properties The grid properties (i.e. facies, porosity, as an option an additional property) which are required by the function model.
Permeability Grid Property is the resultant grid property. Once you have run your model, it will be available in the JewelExplorer (3D Grids > Your 3D Grid > Properties > Your Permeability Property Model > Permeability). It is read-only.
 ), rename (
  ), or delete (
  ) the existing permeability property models via the toolbar on the Create Permeability Property Model form.
Permeability modeling requires QC processes at two different levels:
- QC at Well Level Once you complete the Permeability Function Modeling workflow, you can QC your model at well level. You can create permeability logs and compare the modeled permeability (i.e. based on your permeability function model) against the permeability measured from cores or obtained from well test interpretation. This is to ensure that everything has proceeded as intended and that you are able to reproduce the expected permeability match.
- QC at 3D Grid Level Once you complete the Permeability Property Modeling workflow, you can QC your model at grid level. You can compare the created permeability grid property against the permeability logs. This QC step may reveal some discrepancies due to the upscaling of the rock properties.
Keep in mind that the permeability function model parameters can be scale dependent. When you create permeability logs for QC purposes, the resolution of the modeled permeability will depend on the resolution of the assigned input (on the Assign Data form). Since permeability is defined on a logarithmic scale, carefully consider the resolution of the assigned logs as they will determine the extreme high and low permeability values.
There also might be significant differences between the measured core permeability and the well test derived permeability values. This might be due to many factors such as: core sample not being representative of the reservoir heterogeneity, whether the samples being drilled parallel or perpendicular to bedding planes, the scale of the measurement, the thickness of the tested reservoir, whether the absolute or the effective permeability is determined, the overburden pressure, slippage effect of gas (i.e. Klinkenberg effect) etc.
To know how the permeability property models work with multiple realizations, see Modeling and Visualizing multiple realizations.
The Permeability Property Modeling workflow consists of the following steps: